Download and print as a PDF (711kB pdf)
What is this information about?
This information is about looking after the pin sites on the external fixator that is attached to your lower leg.
It tells you:
- why you need to keep them clean
- a step-by-step guide to keeping them clean and changing your dressings
- what to do if you have symptoms of a serious infection.
Why have I been given this information?
You have been given this information because when you get home you will need to care for your pin sites and recognise signs of an infection.
You will have already been taught how to do this in hospital, but it can feel a bit daunting to look after your fixator at home, so this information is here to help you.
Keep it in a safe place so you can refer to it when you need to. You can also share it with your family and anyone else who is looking after you.
What is an external fixator?
An external fixator is used to treat fractures (broken bones), reconstruction or fusion (joining together) of bones and joints that are deformed or damaged.
There are two kinds of fixator:
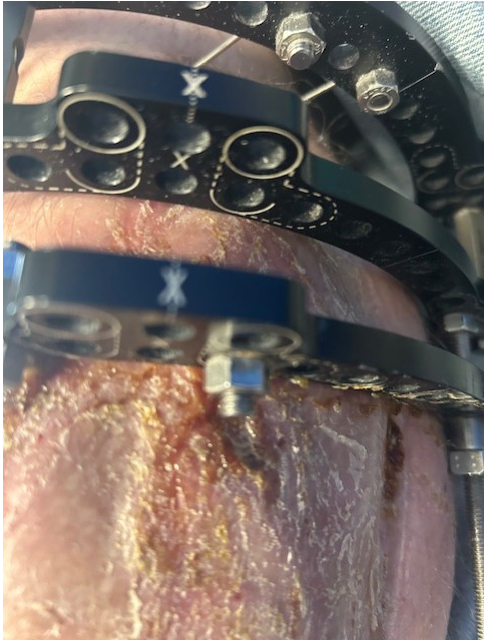
- A circular external fixator. This encircles (goes round) your leg
- A monolateral external fixator. This lies adjacent (next to) your leg
They are attached to the skeleton by fine tensioned wires or metal pins. When discharged from hospital each pin/wire will have a sponge and clip attached to it. The sponge helps protect the pin site and the clip keeps the sponge in place.
Why do I need to know how to care for my pin sites?
Pin site infection
Pin site care is important because the wires or half pins pass through the skin and muscles and into the bone. This increases the risk of an infection on the skin that can spread down into the bone.
Pin site infections can range from minor inflammation (swelling) to a serious bone infection called osteomyelitis. Because of this, it is important to identify and treat pin site infections early on.
How often should I clean my pin sites?
Pin sites may fall into one of three categories: calm, irritated or infected. This affects how often they need to be cleaned. These categories are explained in detail below.
- If the pin sites are calm, we recommend cleaning the pin sites every seven days and replace the sponges.
- If the pin sites are irritated or infected, you should clean the sites and change the sponges daily or follow the advice of the Brighton Limb Reconstruction Service.
In all three cases the pin sites should have the sponges replaced after they have been cleaned.
How often should I check my pin sites for signs of infection?
You should always check your pin sites for signs of infection when you clean them, or in between cleaning if you are concerned that they may be infected.
What does a calm pin site look like?
There should be no discharge, swelling, pain or tenderness where the pin or wire enters the skin. It should look like a piercing.
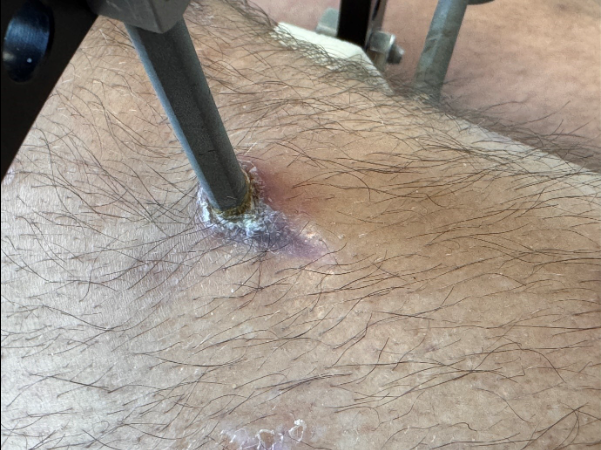
What does an irritated pin site look like?
Pin sites that are irritated or inflamed will show a redness around the wire or pin. The site may also ooze a clear straw-coloured fluid.
This tends to happen in the first couple of weeks after the operation or when the position of the bone is being adjusted. This happens because the wire is being pulled through the skin.
The skin surrounding wires near to joints (like the knee or ankle) can also become irritated and ooze after exercise or increased activity.
Sometimes adding an extra sponge to the pin site can help reduce skin movement around the wire.
An irritated pin site is not an infected pin site. The sponges may need changing more frequently than normal.
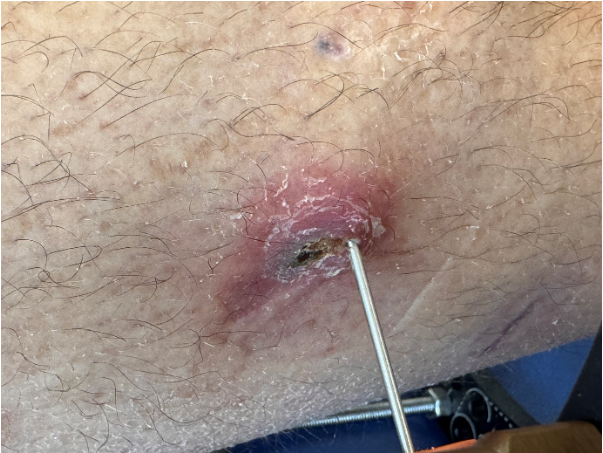
The infected pin site
The signs of an infected pin site are:
- increased pain in the area
- spreading redness of the skin
- increased discharge or pus (not always present)
- increased swelling
- difficulty weight bearing (putting your body weight on that leg)
- you have a temperature or feel unwell.
What to do if a pin site becomes infected
If a pin site becomes infected:
- clean it and change the sponges it at least once a day. If the sponge is very wet, then it should be changed.
- If you are cleaning the infected site at the same time as your other pin sites, then you should always clean the infected site last.
- Thorough hand washing and drying your hands thoroughly with a clean towel is very important. This prevents the infection spreading to the other pin sites.
Be aware
If you have the signs of an infected pin site, you should contact the Brighton Limb Reconstruction Service via email [email protected] as soon as possible.
If you are in severe pain, the leg is very swollen and red, and you feel unwell, do go to your local Urgent Care Centre or Accident and Emergency department.
How should I care for and clean my pin sites?
Showering
You can shower on the day of pin site care. The sponges should be removed before getting into the shower. You can use a mild soap. You will need two towels, one for your body and a separate one (washed at a high temperature) for the affected leg.
Step 1
Gather all the equipment you need before you start:
- Chlorhexidine 0.5% in 70% alcohol or saline if sensitive to chlorhexidine
- sterile gauze
- Ilizarov sponges.
Sometimes people can be allergic to the cleaning solutions or dressings. Please tell us if you know you are allergic to chlorhexidine before you are discharged from hospital. In rare cases they may also cause a skin reaction. If this happens, please stop using them and contact the Brighton Limb Reconstruction Service.
Step 2
Wash your hand thoroughly, including between your fingers and the back of each hand. Dry your hands thoroughly.
Try not to touch anything else before starting the cleaning procedure. If you need to remove the old sponges from the pin sites, make sure to wash your hands again after this.
Step 3
Spray the chlordexidine around the pin then gently wipe with the guaze around the pin once in a circular motion.
Change gauze as often as necessary for each pin.
You may have a scab or crust between the wire and the skin. Do not pick this off. It will lift and fall away when it is ready. Wait until the cleaning solution evaporates (dries) and the skin is dry.
Step 4
Apply a new sponge to the pin and secure it with the clip attached to the wire or pin.
Step 5
Continue until each pin has been cleaned and the sponges replaced.
Step 6
Throw away all the materials used and wash your hands.
Can I go swimming?
If you want to attend a hydrotherapy session or go swimming, we recommend that you do this on the day that you clean your pin sites.
You should not attend hydrotherapy or swimming if your pin sites are inflamed or infected.
Remove your sponges before you get into the pool.
After getting out of the pool you should shower the limb and fixator. You can use a mild soap. You will need two towels, one for your body and a separate one (washed at a high temperature) for the affected leg.
Pin sites should then be cleaned and redressed using the method described above.
Who do I contact if I am worried or have a question?
Please email:
This information is intended for patients receiving care in Brighton & Hove or Haywards Heath.
The information in this leaflet is for guidance purposes only and is in no way intended to replace professional clinical advice by a qualified practitioner.