Dementia is a loss of cognitive functioning (thinking, remembering and reasoning) to such an extent that it interferes with a person’s daily life and activities.
How we help
The activities we provide support our dementia patients with meaning activities during their stay, many of which are supported by voluntary organisations.
Wishing Well
Wishing Well is an interactive live music programme that aims to:
- enrich healthcare settings and support patients’ wellbeing through shared musical experiences
- provide training for musicians and healthcare professionals
- extend the reach of music in healthcare into more hospital, hospice and clinical settings.
Wishing Well partners with NHS Trusts and charities across the South East. Its musicians work closely with healthcare staff to make sure their approach is right for each individual.
Activities volunteers
Activities volunteers support patients in maintaining normal levels of activity during their stay, by encouraging them to:
- take part in activities being organised on the ward
- sit out of bed for meals
- ask clinicians questions about care plans during their stay, getting home and anything that may be worrying them.
Activity boxes
Our ward activity boxes were generously supplied and filled by the Friends of Chichester and Worthing hospitals. We’re able to keep them topped up through fundraising.
Donations to our dementia fund for more equipment like this are always very welcome.
Contributions can be made through Love your Hospital charity.
RITA
RITA (Reminiscence Interactive Therapy Activities) software helps reduce anxiety, isolation, depression and confusion in older people.
RITA is used across the UK and provides a wide range of benefits for patients, including:
- fewer falls
- less ‘specialling’ (1:1 observation and care)
- a significant reduction in use of anti-psychotic medication
- dramatically-improved patient experience
- significant improvements in patients with a dementia who are unable to sleep
- supporting dignity, respect and wellbeing for patients at the end of life
- better quality of patient-centred care
- shorter hospital stays
- improved interaction with patients for their carers and relatives.
Twiddlemuffs
A Twiddlemuff is a knitted or crocheted band we can attach items to for a patient with dementia to twiddle them in their hands while on the wards at our hospitals.
They help stimulation while in hospital and we’ve found they’re simple to make and use, and really valued by our patients.
We would be delighted if any willing knitters could help us create more Twiddlemuffs as part of our dementia awareness work.
You can drop off completed Twiddlemuffs at our hospitals’ receptions. Please enclose your name and address so that we can thank you for your kindness.

How to make a twiddlemuff
Materials
This muff pattern is perfect for using up left-over and odd balls of wool. Different textures of wool are also good for stimulation.
- needles: 6.5 mm straight needles or 8 mm circular
- beads, zips, ribbons – anything that can be twiddled but which will not break
Directions
Cuff
- cast on 40 stitches using 2 strands of double knitting wool (you can also use one strand of chunky wool instead)
- work in stocking stitch (knit a line, pearl a line) for 11 inches (28 cm).
- Muff body
- continue with stocking stitch and use up any oddments of different-textured wool – e.g. chunky, mohair, snuggly, ribbon, chenille
- knit until work measures 23 inches (58.5 cm)
- cast off.
Decoration and finishing
- decorate the muff body with beads, flowers, zips, loops etc. Make sure all embellishments are sewn fast and cannot be pulled off easily
- neatly join sides together with pearl side facing you
- turn inside out
- push the cuff up inside the muff body
- neatly sew together the two ends.
Well done and thank you for your support.
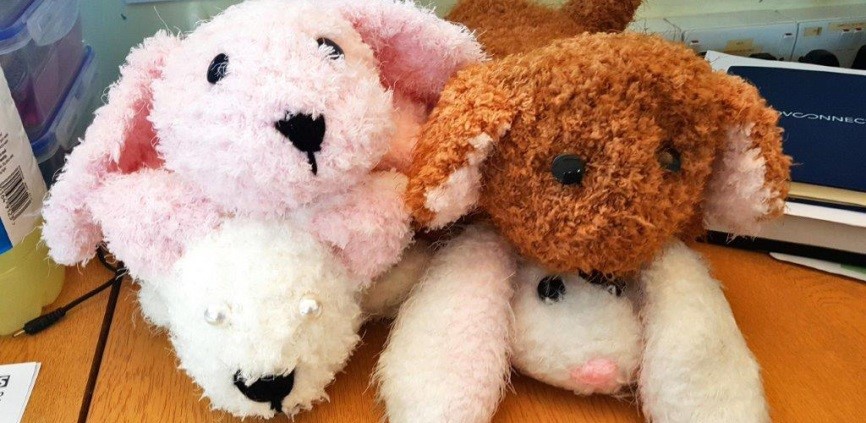
Knit a pet twiddlemuff using chunky fluffy wool
Wool used Robin fleece chunky, and Wendy Eider chunky
Needles 5 1/2 mm
Tube or body for all pets
- cast on 45 stitches
- work in garter stitch throughout
- for the inside of the tube work 11 inches
- for the outside continue until your work measures 23 inches
- you can use odd bits of wool for the inside, and use the colour you wish the pet to be on the outside section
- cast off
- sew the two long sides together to make a long tube, then push one half up into the outside half (it’s now double thickness)
- sew the open ends together
Tail for dog
- cast on 16 stitches and knit 5 rows
- cast off 1 stitch at each end of next row and every other row until only 2 stitches remain
- cast off then fold in half, and sew the 2 sides together and stuff
- place at the end of the tweedlemuff and sew on to the top part of the tube to create a tail at the end of the tube
Tail for cat
make the same as above just make it longer than before you start decreasing and perhaps change to another colour before the end to match the colour for the cat’s face
Cat head
- using the main colour and UK8, US6 needles cast on 16 stitches
- 1st row knit one row (18 stitches)
- next row K1, M1, knit to last stitch, M1, K1 (20 stitches)
- repeat last two rows once more (24 stitches)
- next row K1, M1, knit to last stitch, M1,K1 (26 stitches)
- work 13 rows in garter stitch
- next row K1, K2 together, knit to last 3 stitches, K2 together, K1 (24 stitches)
- next row K1, K2 together, knit to last 3 stitches, K2 together, K1 (22 stitches)
- next row Repeat last two rows once more (18 stitches)
- next row K1, K2 together, knit to last 3 stitches, K2 together, K1 (16 stitches)
- next row K1 row
- repeat from * to * (26 stitches)
- next row K1, K2 together, knit to last 3 stitches, K2 together, K1 (24 stitches)
- next row K1, K2 together, knit to last 3 stitches, K2 together, K1 (22 stitches)
- repeat last 2 rows once more (18 stitches)
- next row K1, K2 together, knit to last 3 stitches, K2 together, K1 (16 stitches)
- cast off
Cat face
- using a contrast colour (same as tail tip) and same needles
- cast on 18 stitches
- next row K1, M1, K7, M1, K2, M1, K7, M1, K1 (22 stitches)
- next row Purl 1 row
- next row K1, K2 together, K7, M1, K2, M1, K7, K2 together, K1 (22 stitches)
- next row Purl 1 row
- next row Repeat last two rows four times
- next row K1, K2 together, knit to last 3 stitches, K2 together, K1 (20 stitches)
- next row Purl 1 row
- next row K1, K2 together, K4, K2 together, K2, K2 together, K4, K2 together, K1 (16 stitches)
- next row Purl 1 row
- next row K1, K2 together, K2, K2 together, K2, K2 together, K2, K2 together, K1 (12 stitches)
- next row Purl 1 row
- next row K1, K2 together, knit to last 3 stitches, K2 together, K1 (10 stitches)
- next row Purl 1 row
- repeat last two rows three times (4 stitches)
- next row K2 together, K2 together (2 stitches)
- Cast off
Cat ears – make 2!
The ears are worked in garter stitch and same needles, using main colour
- cast on 12 stitches and K2 rows
- next row K1, K2 together, knit to last 3 stitches, K2 together, K1 (10 stitches)
- knit 2 rows
- repeat last three rows three more times (4 stitches)
- next row K2 together, K2 together (2 stitches)
- next row K2 together (1 stitch)
- thread yarn through remaining stitch to cast off
- embroider the nose and use buttons for the eyes
Make up head
- sew side seams of the head and stuff lightly with toy stuffing
- sew the face to the front of the head, stuff lightly to give definition as you go, attach eyes to the face securely, and now add more stuffing to the head to fill out.
- Embroider the nose in place with black wool and add mouth and whiskers.
- sew ears to the top of the head.
- Sew head to the front of the body/tube
Dog head
UK7 needles
- cast on 14 stitches using mainly furry wool
- first row Purl (14 stitches)
- next row K1, M1, knit to last 2 stitches, M1, K1 (16 stitches)
- next row P1, M1, purl to last 2 stitches, M1, P1 (18 stitches)
- repeat last 2 rows twice more
- next row K1, M1, knit to last 2 stitches, M1, K1 (28 stitches)
- next row Purl row (28 stitches)
- repeat last 2 rows twice more (32 stitches)
- next row K15, M1, K2, M1, K15 (34 stitches)
- next row P16, M1, P2, M1, P16 (36 stitches)
- next row K17, M1, K2, M1, K17 (38 stitches)
- next row P18, M1, P2, M1, P18 (40 stitches)
- next row K19, M1, K2, M1, K19 (42 stitches)
- next row P20, M1, P2, M1, P20 (44 stitches)
- next row K21, M1, K2, M1, K21 (46 stitches)
- purl one row
- next row K22, M1, K2, M1, K22 (48 stitches)
- work 9 rows in stocking stitch
- next row K1, K2 together, K18, K2 together, K2, K2 together, K18, K2
- together, K1 (44 stitches)
- next row Purl one row
- next row K1, K2 together, K16, K2 together, K2, K2 together, K16, K2
- together, K1 (40 stitches)
- purl one row
- next row K1, K2 together, K14, K2 together, K2, K2 together, K14, K2
- together, K1 (36 stitches)
- next row P1, P2 together, P12, P2 together, P2, P2 together, P12, P2
- together, P1 (32 stitches)
- next row K1, K2 together, K10, K2 together, K2, K2 together, K10, K2
- together, K1 (28 stitches)
- next row P1, P2 together, P8, P2 together, P2, P2 together, P8, P2
- together, P1 (24 stitches)
- next row K1, K2 together, K6, K2 together, K2, K2 together, K6, K2
- together, K1 (20 stitches)
- next row P1, P2 together, P4, P2 together, P2, P2 together, P4, P2
- together, P1 (16 stitches)
- cast off and sew together and stuff
Dog ears – make 2!
- cast on 11 stitches using main wool colour and 4.5mm, Uk7 knitting needles
- start with a knit row and work 6 rows in stocking stitch
- next row K1, M1, knit to last stitch, M1, K1 (13 stitches)
- three rows in stocking stitch
- next row K1, M1, knit to last stitch, M1, K1 (15 stitches)
- work 9 rows in stocking stitch
- next row K1, K2 together, K1 to last 3 stitches, K2 together, K1 (13 stitches)
- purl one row
- repeat last 2 rows twice more (9 stitches)
- cast off
Dog ear linings – make 2!
I didn’t do linings when using furry wool. Use a different colour shade for the lining
- cast on 9 stitches using UK7 needles
- start with a knit row and complete 4 rows
- next row K1, M1, knit to last stitch, M1, K1 (11 stitches)
- work 3 rows in stocking stitch
- next row K1, M1, knit to last stitch, M1, K1 (13 stitches)
- work 7 rows
- next row K1, K2 together, knit to last 3 stitches, K2 together, K1 (11 stitches)
- next row P1, P2 together, Purl to last 3 stitches, P2 together, P1 (9 stitches)
- next row K1, K2 together, knit to last 3 stitches, K2 together, K1 (7 stitches)
- Cast off
Make up head
- sew black buttons on the face for the eyes
- sew the head together and stuff. Embroider the nose in place
- sew the ears together, pin in place first to check position
- embroider the mouth under the nose using straight stitches
- firmly sew the head to the body
How to make a tiny twiddle
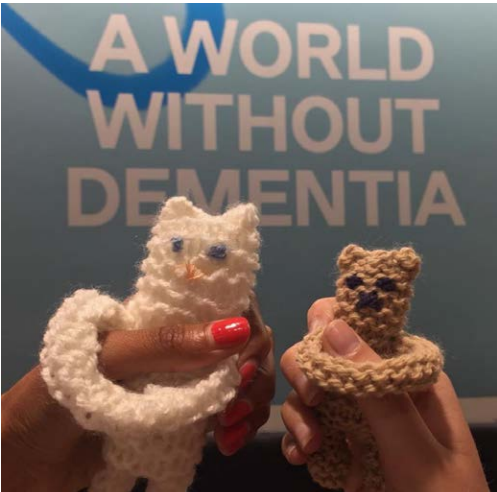
For fiddlers, twiddlers and anyone who needs a special friend. A Tiny Twiddle can be made in an evening and loved forever.
Equipment
• 4mm knitting needles
• Small amount of DK yarn
• Black yarn for eyes and nose
• Sewing needle
Instructions
Head and Body
• cast on 12 stitches
• knit 12 rows
• knit 2 stitches, knit 2 stitches together, bring yarn forward, knit to last 5 stitches, knit 2 stitches together, bring yarn forward and knit to end of row (making simple buttonholes)
• knit 1 row (to finish buttonhole structures)
• knit 12 rows- legs next
Legs
• working on first 6 stitches only, slip remaining 6 stitches onto a stitch holder
• knit 6 rows
• increase into every other stitch (9 stitches)
• knit 5 rows
• to finish legs break yarn and sew through loops to make feet
• repeat with remaining 6 stitches to make other leg
Arms
• cast on 24 stitches
• knit 6 rows
• cast off

To make up
• sew arms along long seam using whip stitch and put to one side
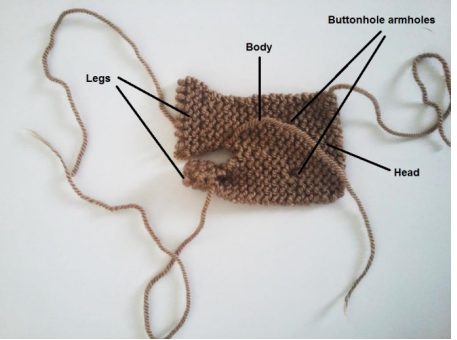
• sew legs up to body (as shown in bottom leg above – this one piece makes the head, body and legs)
• sew body (seam is at back) up to buttonholes
• thread arms through the buttonholes and sew ends together
• secure arms in place by stitching an arm onto each buttonhole
• lightly stuff body (a plump tummy looks fab!) – leave legs unstuffed
• continue sewing up to top of head and stuff lightly
• sew along top of head, making ears by sewing triangles in corners

- embroider eyes and nose, mouth using black yarn
- Ta da ! you have your tiny twiddle

Weald and Downland Museum outreach
Members of the Weald & Downland Living Museum’s Outreach Team are regular visitors to Worthing and St Richard’s Hospitals as ‘Dementia Friends’ to our patients.
The Weald & Downland Living Museum is dedicated to the buildings and lives of the ordinary people who lived in rural south east England over the last thousand years.
Their outreach volunteers bring materials and artefacts from the museum for our patients to enjoy looking at and handling.
The volunteers are skilled at finding an individual connection with the objects for each person, encouraging conversation between group members and promoting the learning of new skills.
They will also visit bedsides, which can be particularly powerful as some patients are often anxious or unwilling to visit the table on which the artefacts are displayed. Patients are left with something they have made, or have helped to make, (for example, a small corn dolly or a muslin bag with herbs) is another important part of the visit and is much appreciated by everyone on the ward.